Recording Brass Instruments
Recording Trumpet and Trombone in a Home Studio
Recording and Mixing great brass sounds in a home studio. Concentrating on recording and mixing the Trumpet and Trombone, including an overview of the physical characteristics of brass instruments and how they’re played.
This article originally appeared in the November 2004 issue of Electronic Musician magazine.
The Brass Ring – Recording and Mixing Brass in a Home Studio
by David Summer
Guitar, Keys, Bass, Drums. Guitar, Keys, Bass, Drums. Guitar, Keys, Bass, Drums, Trumpet. …Trumpet? Some day it’s going to happen, you will be faced with recording a trumpet player, trombone player, or maybe even a (shudder) brass ensemble. Here I’ll give you some suggestions on how to record brass players, whether you are recording soloists or several players at once. This is about recording brass in particular, rather than “horn sections”, which frequently consist of brass and woodwind instruments, although some of the same recording and mixing techniques will apply to all wind instruments.
There are many instruments in the brass family. I’ll concentrate on recording trumpet and trombone since these are, by far, the most popular brass instruments. You can hear some short trumpet and trombone audio clips that demonstrate some of the points covered in this article. I will also review with you some general knowledge concerning brass instruments designed to help you in coming up with your own new and innovative ways of recording these unique sounds.
Microphone Selection
There is a reason why armies have used buglers for centuries. The sound of the bugle, essentially a valve-less trumpet, carries as few other instruments do. The trumpet will often not only be loud, but may exhibit a kind of piercing quality as well. This is best tamed by the use of a ribbon microphone.
Recording Brass – Mics
Out of all the basic microphone types, a ribbon mic will generally give you the most full and natural trumpet sound. A dynamic microphone will also yield a somewhat natural sound, though usually with a bit more color than the ribbon. A condenser mic often has a slight high-end boost designed to give vocals a “sparkle”. This can work against you in recording the trumpet, often resulting in the somewhat piercing sound I spoke of.
These considerations are somewhat mitigated when recording the trombone and other low brass instruments. Sometimes the trombone will benefit from a little more color provided by a dynamic microphone. When recording more than one brass player at a time, a ribbon microphone can be effective in achieving a good brass blend when used as an overhead.
A combination of microphone types can also work well. For example, try using a ribbon on one channel and a condenser on the other. Pan the results left and right about 25%. Make the ribbon a bit hotter than the condenser. With this combination you will get a natural sound, achieved by the ribbon, spiced to taste by the brightness of the condenser. Try this if the ribbon mic alone seems to make the brass sound too dark or lifeless when placed in your mix.
Microphone Placement and Room Considerations
 When experimenting with microphone placement, remember that on woodwind instruments, sax, flute, oboe, bassoon, etc, the sound comes from the keyholes in the instrument as well as the bell (or “foot”, in the case of the flute). The brass instrument’s sound really comes solely from the vibration of the bell. Notice that I didn’t say the sound comes out the end of the bell, but rather from the vibration of the bell. This is an important distinction. The importance of the bell is demonstrated by the fact that when purchasing a professional, custom made, brass instrument the player will usually be given a choice as to the type of material used to make the bell.
A brass instrument’s sound is affected greatly by the room in which it’s recorded. Perhaps the single most important point to consider in microphone placement when recording brass instruments, is that the microphone should be trying to capture the room sound and therefore shouldn’t be placed right at the end of the bell. For the trumpet try placing the microphone about 4 to 6 feet in front the instrument and a few inches above or below the line of sight of the bell. Point it about 40 degrees off axis. This will help to cut down on air sound as well as capture more of the room sound.
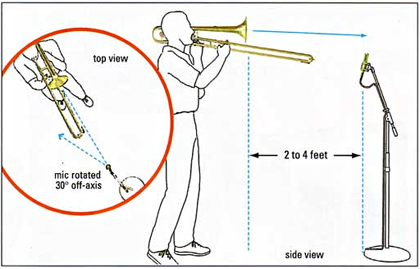 For trombone, and other lower brass, the microphone can be closer and perhaps a little more on axis then the trumpet, try about 30 degrees. When using a ribbon keep in mind the high spl generated by the trumpet.
In any room, try just pointing the instrument in another direction. You may be surprised by a much different sound. A previously stuffy brass sound can open right up, simply by pointing the instrument in another direction. Also, for a different sound, try placing the mic a bit closer but behind the player.
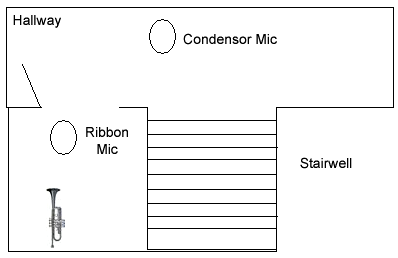 Some of the best classical brass recordings I’ve made at home was done using the ribbon plus condenser technique previously described. I placed the ribbon in the bedroom where I was playing and the condenser in the hallway, with the stairwell. I panned the tracks and, with no EQ or effects at all, had some great natural sounding trumpet tracks.
If you are recording more than one player at a time, try allowing some mic bleed. Even more bleed than you might normally allow when recording other instruments. You will generally achieve a more “section like” sound this way.
Brass Players
Brass playing is extremely physically demanding. It requires a tremendous amount of air and is also taxing on the lips. Image holding a piece of metal against your lips, taking in as much air as you can on every breath, and blowing with a buzzing sound for a few hours. Brass players often jog, swim or workout with weights to handle the high physical demands made by the instrument. It’s an accepted fact among brass musicians that as we age, we will lose some of our playing ability due to the physical demands alone. Part of our practice is directed toward building endurance on the instrument. This is true for all brass players, but is especially true for trumpet players. Keep this endurance factor in mind when planning a recording session involving brass players, especially if the players are not professionals.
![]() If studio time is a factor, consider identifying and recording the more demanding sections of your tunes first. You may need to consult a brass musician to help you find these, but generally they will be the sections that are loudest and those that contain the highest notes. When doing a session, use your ears to tell you when the players are becoming tired; as a point of pride they will seldom admit it. Schedule more breaks in a session than you normally would.
If studio time is a factor, consider identifying and recording the more demanding sections of your tunes first. You may need to consult a brass musician to help you find these, but generally they will be the sections that are loudest and those that contain the highest notes. When doing a session, use your ears to tell you when the players are becoming tired; as a point of pride they will seldom admit it. Schedule more breaks in a session than you normally would.
To aid in combating endurance problems, and save studio time as well, try using the same recorded licks more than once in a tune. These repetitions will often be found in the chorus section of a tune. This device must be used with care. Perceptive listeners have come to expect hearing the variety of nuances produced when a lick is repeated in a live situation. They may be distracted from your recording if they detect your use of this trick. A good way to lessen the chance of this happening is to use this device only in harmony lines, where it’s likely to be less noticeable. Record the top one or two lines differently each time the line is repeated, then copy and paste one or more of the harmony lines from a previous section.
![]() When doing a session with a brass player, expect to spend time doing a lot of punch-ins. A discussion of brass harmonics is clearly beyond the scope of this article, and is probably something that only brass players and academicians care about anyway. The bottom line is that there are many different notes that can be played on a brass instrument using the same valve combination, or, in the case of the trombone, slide position. The brass player must use their lips, tongue, jaw, etc in order to hit the note they are aiming for out of all the notes possible. Occasionally the player’s aim will be off.
When doing a session with a brass player, expect to spend time doing a lot of punch-ins. A discussion of brass harmonics is clearly beyond the scope of this article, and is probably something that only brass players and academicians care about anyway. The bottom line is that there are many different notes that can be played on a brass instrument using the same valve combination, or, in the case of the trombone, slide position. The brass player must use their lips, tongue, jaw, etc in order to hit the note they are aiming for out of all the notes possible. Occasionally the player’s aim will be off.
Chances for missed notes increase when playing in the upper register where the harmonics are closer together. In addition to missed notes, the brass player, like the woodwind player and vocalist, faces the possibility of a “cracked” note. A cracked note is a note that is not attacked correctly.
Sometimes these missed or cracked notes are left in recordings, especially in jazz recordings, where the overall emotion displayed in the performance may be considered more important than some errant notes. Most of the time, however, these notes, or the phrases that contain them, will need to be corrected with a punch-in.
Stick a Mute In It
A mute is often used in brass recordings to provide a variation on the standard brass tone colors. See my web page on brass instrument mutes for complete overview of brass instrument mutes including pictures and sound clips.
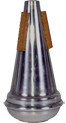 When recording muted brass keep in mind that the volume level will be lower with a mute in the instrument. If going directly from an open section to a muted one, give the player a few seconds to insert the mute in his or her instrument.
Mutes can be used in a pop recording to good effect by having the players muted in the first half of the recording and then open in the second half. Alternatively, try having the brass muted only in the middle of the recording. The muted brass will not only be softer, but will also yield an altogether different tone color.
Mixing and Effects
Achieving a thick, full brass sound can be particularly challenging in a home recording or small studio situation. It’s often tempting to try to rely on effects processing to achieve this sound. However, the overuse of effects will tend to change the sound past the point where it is recognizable as brass playing.
Recording Brass – Doubling
As previously stated, a basement can provide a natural open brass sound. A simple, natural way to achieve an even fuller brass sound, in a non-classical recording, is to record the player or section, playing the same lines twice. Then use both recordings panned about 25 percent right and left. For an even fuller sound, record the parts a third time and use this in the center of the mix, although this change suffers from the law of diminishing returns.
Simply panning copies of the parts won’t work. It’s the almost infinite variances provided by the human air stream through the instrument that allow this overdubbing technique to work. If one recording of the parts is all you have to work with, you can try for a fuller sound by placing a copy at a very slight offset from the original. However, this doesn’t work nearly as well as a second recording of the same parts.
I’ve described some methods for achieving natural reverb. You will probably need a touch more in the mixing stage, but again, go light. Another mixing technique aimed at getting a full, but natural, brass sound is to mix all the brass tracks, and add a touch of reverb to the mix down. Then add the mixed down track back into the project, keeping all the dry (or naturally reverberated) tracks as well. Now you have several natural brass tracks and one mixed track with some added reverb. Bring the volume of the mixed down, reverberated track up just enough to add the overall reverberation you are looking for.
Some EQ may be needed to temper a little of the brightness inherent in the sound of the trumpet. You may also want to add or remove some bottom from the trombone and other low brass instruments. I find myself most often adding a little bottom to the trombone to help balance the trumpet. You may also want to try some midrange boost on a brass mix to produce a fuller sound. All this being said, don’t be afraid to go au natural and skip the EQ all together.
Classical Brass
![]() “Horns” is often used as a generic term to encompass both woodwind and brass instruments. If you say you are using horns in a tune to a classical brass player though, he or she may well think you are talking about a group of French horn players. I’ve heard musicians say they are going to add “brass” to a tune when they really mean a horn section, consisting of brass and woodwind players. Brass instruments include trumpet, cornet, trombone, French horn, euphonium and tuba. Woodwinds include the saxophones, flute, oboe and bassoon.
“Horns” is often used as a generic term to encompass both woodwind and brass instruments. If you say you are using horns in a tune to a classical brass player though, he or she may well think you are talking about a group of French horn players. I’ve heard musicians say they are going to add “brass” to a tune when they really mean a horn section, consisting of brass and woodwind players. Brass instruments include trumpet, cornet, trombone, French horn, euphonium and tuba. Woodwinds include the saxophones, flute, oboe and bassoon.
Brass ensembles are popular groups in the classical world. If you are ever in a position of recording such a group, you should know their standard configurations. The most common is the brass quintet, which consists of two trumpets, French horn, trombone, and tuba. This ensemble, with its inclusion of a tuba, is designed to produce a sound that can fully cover the range of all brass instruments. Another common group is the brass quartet. This group will usually have the same instrumentation as the quintet minus the tuba. However, the quartet often goes with two trumpets and two trombones as well.
 See more information about taking quality private trumpet lessons from David Summer.
When recording these ensembles, many of the same rules apply as when recording a pop “horn” section. The players will want to see each other for visual cues. They rarely play positioned in a straight line, but rather prefer a semi-circle seating arrangement. The players take their cues from the first trumpet player. Try using just 2 overhead microphones, rather than micing each instrument.
Coda
Recording brass can be challenging but rewarding. The sound of real brass can help make your tunes stand out. Brass can add sparkle and fire or smoothness and sophistication. If you own a recording studio, school based or professional brass ensembles can be potential clients.
Published in Electronic Musician Magazine March 2006
Ten Brass Recording and Mixing Tips
1. For a natural brass sound, use a ribbon microphone
2. Don’t close-mic the bell, record the room sound
3. Try combining 2 different mic types
4. Position the mic below the player’s line of sight
5. Point the mic off axis from the bell
6. Try pointing the instrument in other directions
7. Expect punch-ins
8. Schedule sessions with the “fatigue factor” in mind
9. Double or triple (non-classcical) track parts for a fuller sound
10. Go light on the reverb (except for special effect)
Hear some of David Summer’s home studio recordings and some location recordings made while performing at church services throughout MA, RI and NH.
You may also be interested in David’s Selected Duets for Trumpet podcast.