Recording the Flute in a Home Studio
Recording the flute in a home studio. Including selecting a location for the flute recording, as well as choosing the proper microphone and microphone positioning. Also included is advise for the flutist making a recording.
This article originally appeared in the March 2006 issue of Recording magazine.
Blowin’ in the Wind – Recording the Flute in a Home Studio
by David Summer
![]() Recording a flutist, either as a soloist or as part of an ensemble, presents unique and perhaps unfamiliar challenges. Here I’ll describe some methods I’ve used to record myself and other flutists in a home recording setting. I’ll also briefly describe some of the characteristics of the instrument itself that may help you achieve the type of flute sound you are looking for in your own recordings.
Recording a flutist, either as a soloist or as part of an ensemble, presents unique and perhaps unfamiliar challenges. Here I’ll describe some methods I’ve used to record myself and other flutists in a home recording setting. I’ll also briefly describe some of the characteristics of the instrument itself that may help you achieve the type of flute sound you are looking for in your own recordings.
You can hear recorded flute audio clips that demonstrate some of the points covered in this article. The two different musical phrases played on these sound clips were written to cover nearly the entire effective range of the flute. This is important in microphone selection and placement because of the vast difference in timbre between the flute’s lowest and highest notes.
Taking a ribbon
Recording Flute – Mics
While brass instruments almost always sound best when recorded with a ribbon microphone, the type of microphone you choose to record a flute may depend on the type of music you are recording. For a jazz flute recording, consider using a condenser microphone. A condenser will generally capture more of the flute’s many overtones, resulting in a bright sound.
A dynamic mic gives a less bright and detailed flute sound. This sound may be more suited to a rock or R&B band. I’ve also used a dynamic to good effect when recording flutes that are meant to be in the background of a song, behind a vocalist for example.
For a somewhat darker, fuller and natural flute sound, use a ribbon microphone. You’ll find the higher notes have a bit less bite and the lower range is fuller sounding. A ribbon mic is an excellent choice when recording a classical flute soloist. The ribbon also takes EQ especially well.
As you listen to these clips, notice that the differences in microphone types are more apparent in the extreme ranges of the flute.
To air is human
It takes a tremendous amount of air to play the flute. Grab a soda bottle and make a loud tone by blowing air over the top, just as you did as a kid. Now do that for a few hours and you’ll get an idea of the amount of air it takes to play the flute. The flutist blows air over the top of the blowhole located in the headjoint. It’s this concentrated stream of air, moving in and out of the blowhole, that produces sound from the flute.
 By watching a flutist you can see that he or she changes pitches by pressing keys on the flute. However, what is less obvious is that the direction of the flutist’s air stream also changes depending on the octave they are playing in. This can affect microphone placement, especially if you decide to place a microphone near the headjoint of the flute. When you do a sound check, try to have the flutist play some notes roughly covering the entire range they will be using for the recording.
Recording Flute – Positioning
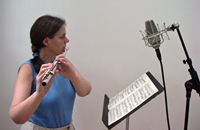
For a good all-around sound, start by placing the mic 2 feet in front of the flutist, positioning it halfway down the body of the instrument. Raise the mic so that it is about 6″ above the flute and angle it down so that it’s pointing at the body of the flute. Then, twist the mic about 10 degrees to the right so that it’s not aimed directly at the body of the flute but more at the foot of the instrument-see the photo at left for a profile view. Placing the mic half way down the body of the flute, in this way, will give you a full flute sound with some amount of natural airy quality.
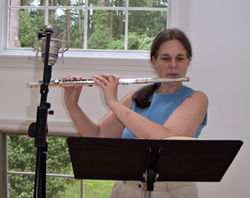
If you feel you are getting too much air sound, try moving the microphone position to the foot of the flute, as shown in the photo at right. This will result in a somewhat less full sound but one that may be smoother sounding. You may also mitigate an airy sound by increasing the angle of the microphone, relative to the flute, away from the instrument.
Placing the microphone near the headjoint of the flute results in a harsher, very airy sound. This may be good for a rock or R&B recording or as a special effect. For a different effect, you can get a somewhat ethereal flute sound by placing the microphone a couple of feet behind the flutist. Raise the mic a foot or 2 above the player and angle it downward.
For a rich sounding stereo flute recording, place a ribbon as you normally would and then place a condenser 6 feet in front of, or 3 feet behind, the flutist. Pan the two tracks +/-25 degrees.
What’s that sound?
Like all woodwinds, the flute has many moving parts. All those keys can produce clicking sounds that may be picked up in recording. Listen for clicking keys when doing a sound check. If they seem very distracting, the flutist may be able to eliminate at least some of the sound by making adjustments to the instrument.
However, be open to the possibility of leaving some of that sound in your recording. It’s a natural byproduct of playing the instrument. If you listen closely to recordings of woodwind players, especially soloists, you’ll often hear the occasional clicking key. They can add an air of authenticity to your recording. You’ll have to decide how far to go with this before it becomes distracting, though.
When recording in a basement, as I like to do for all wind instruments, you may pick up the sound of sticking pads, especially in a humid summer. Compensate for this by cranking up a dehumidifier for a while before the session.
A flute for all seasons
 When you hear a recording of a flute, the instrument you hear may not be the one you think of from your high school band days. The type of flute you are recording may affect your choice of microphone and microphone placement.
The most common type of flute is known simply by the generic name ‘flute’. This flute, pitched in C, is the one that you see and hear most often in bands and orchestras.
The piccolo, pitched an entire octave above the flute, is often used in orchestras and concert bands (think of the piccolo solo in Sousa’s “Stars and Stripes” march). It’s also used occasionally in jazz, notably by Hubert Laws. While the flute is often considered a mellow sounding instrument, the piccolo may be thought of as the flute’s strident younger sister. Its high pitch and resulting high overtones tend to give the piccolo a shrill, piercing sound that can be tamed by using a ribbon microphone. Also, place the mic further away from the performer than you would for a flutist. Start with a distance of 4 feet and don’t be afraid of going even further away.
If the piccolo is the flute’s younger sister, the alto flute, pitched a fourth below the flute, is a mellower older sibling. It’s often used in New Age and Bossa Nova recordings. For a good example listen to Herbie Mann playing Jobim’s “Caminhos Cruzados” on the CD Beyond Brooklyn. When recording this flute start by positioning the microphone just a foot, or even less, away from the flute. Taking advantage of the mic’s proximity effect for this instrument can produce a very intimate sound. The alto flute takes more air to play than the flute so you may pick up more breath sound.
To a lesser degree, the type of material it’s made from and the thickness of the instrument also influence the sound of the flute. Most professional flutes are made from solid silver. However, professional flutes are also made from gold and even platinum. These flutes are said to have a more mellow sound and greater dynamic range than the more common silver flute.
Effective recordings
A church can be an excellent setting for a classical flute recording. The natural reverberation found in most churches will produce a full, open and natural flute sound. For home recording, try a basement or large hallway.
![]() When recording the flute, I always record dry and then normally mix with a very light touch on the effects. For EQ, to add a little warmth or fullness to the sound, try a small boost in the 500 Hz to 1 kHz range. To remove some of the airy or breathy sound in your recording, use subtractive EQ in the 5 to 6 kHz range.
When recording the flute, I always record dry and then normally mix with a very light touch on the effects. For EQ, to add a little warmth or fullness to the sound, try a small boost in the 500 Hz to 1 kHz range. To remove some of the airy or breathy sound in your recording, use subtractive EQ in the 5 to 6 kHz range.
Of course, the amount of compression you use will depend on the type of music you are recording. For classical, I rarely use compression at all. For jazz, start with a low 1.5:1 ratio, and use higher ratios for blues and rock. The higher ratios are often needed to make the flute blend with the rest of the band. Even when doing a classical recording, I’ll add a touch of reverb, particularly when recording solo flute. I’ll start with a 15% wet signal and a long attack time.
The flute can be delicate and beautiful or harsh and demanding. (Hmm…just like a few flutists I’ve known.) Any way you want it, hopefully now you have more ideas on how you can capture it.
 See more information about taking quality private flute lessons from David Summer.
Published in Recording Magazine March 2006
Hear some of David Summer’s home studio recordings and some location recordings made while performing at church services throughout MA, RI and NH.
You may also be interested in David’s Selected Duets for Flute podcast.